reoger的记录

--以后的你会感激现在那么努力的自己

0%

okhttp解析

OkHttp是一个处理网络请求的开源项目,是Android端最火热的轻量级框架,由移动支付Square公司贡献用于替代HttpUrlConnection和Apache HttpClient。随着OkHttp的不断成熟,越来越多的Android开发者使用OkHttp作为网络框架。

简单使用

在真正进行源码分析之前,简单的回顾一个okhttp的简单使用。首先将okhttp继承到自己的项目中,在build.gradle添加如下的依赖:

1
compile 'com.squareup.okhttp3:okhttp:3.7.0'

下面是一个okhttp简单进行get请求的一个例子:

1
2
3
4
5
6
7
8
9
10
11
12
13
14
15
16
17
18
19
20
21
22
23
24
25
26
27
28
29
30
//1.拿到okhttpClient对象
OkHttpClient okHttpClient = new OkHttpClient();

//2. 构造request对象
Request.Builder builder = new Request.Builder();
Request request = builder.get().url("http://www.baidu.com").build();
//3. 构建Call对象
okhttp3.Call call = okHttpClient.newCall(request);
//4.执行
//同步执行 call.execute();

//异步执行
call.enqueue(new Callback() {
@Override
public void onFailure(okhttp3.Call call, IOException e) {
//失败的回调
}
@Override
public void onResponse(okhttp3.Call call, Response response) throws IOException {
//成功的回调
final String repo = response.body().string();
Log.d("TAG",repo+" ");
runOnUiThread(new Runnable() {
@Override
public void run() {
mText.setText(repo);
}
});
}
});

上面的代码用okhttp实现了一个简单的网络请求,主要由四步组成。关于okhttp更多的用法请参考博客。对上面的okhttp中常用的类做一个简单的介绍:

  1. OkHttpClient 可以理解用户面板,发送的网络请求都是通过他来实现的,每个OkhttpClient都在内部都维护了属于自己的任务队列,连接池,Cache,拦截器等,所以在使用OkHttp作为网络框架时应该全局共享一个OkHttpClient实例。
  2. Request 可以理解为用户发送的请求。
  3. Response 是响应是对请求的回复,包含状态码、HTTP头和主体部分。
  4. Call 描述一个实际的访问请求,用户的每一个网络请求都是一个Call实例。

下面将对上面的四步一步一步来进行分析,并探究其源码的实现。

创建okhttpClient对象

关于okhttpClient对象,在上面已经进行了一个简单的解释,那么他为甚是这个样子的,下面通过源码来验证。下面是OkHttpClient类中的部分代码:

1
2
3
4
5
6
7
8
9
10
11
12
13
14
15
16
17
18
19
20
21
22
23
24
25
26
27
public OkHttpClient() {
this(new Builder());
}

public Builder() {
dispatcher = new Dispatcher();//分发器
protocols = DEFAULT_PROTOCOLS;//协议
connectionSpecs = DEFAULT_CONNECTION_SPECS;//传输层版本和连接协议
eventListenerFactory = EventListener.factory(EventListener.NONE);//事件工厂
proxySelector = ProxySelector.getDefault();//代理选择
cookieJar = CookieJar.NO_COOKIES;//cookie
socketFactory = SocketFactory.getDefault();//socket工厂
hostnameVerifier = OkHostnameVerifier.INSTANCE;//主机名字确认
certificatePinner = CertificatePinner.DEFAULT;//证书链
proxyAuthenticator = Authenticator.NONE;//代理身份验证
authenticator = Authenticator.NONE;//本地身份验证
connectionPool = new ConnectionPool();//连接池,复用连接
dns = Dns.SYSTEM;//域名
followSslRedirects = true;//安全套接层重定向
followRedirects = true;//本地重定向
retryOnConnectionFailure = true;//重试连接失败
connectTimeout = 10_000;//连接超时时间
readTimeout = 10_000;//读超时
writeTimeout = 10_000;//写超时
pingInterval = 0;//
}
...

可以看出来,直接创建的OkHttpClient对象并且默认构造builder对象进行初始化。当然,直接创建OkhttpClient是非常简单的,但是其中的配置就只能用默认的配置了。如果需要子的自定义配置,可以通过下面的方式:

1
2
3
4
5
6
7
8
9
10
11
12
13
14
15
16
17
OkHttpClient  okHttpClient= new c.Builder()
.cookieJar(new CookieJar() {
private final HashMap<HttpUrl, List<Cookie>> cookieStore = new HashMap<>();

@Override
public void saveFromResponse(HttpUrl url, List<Cookie> cookies) {
cookieStore.put(url, cookies);
}

@Override
public List<Cookie> loadForRequest(HttpUrl url) {
List<Cookie> cookies = cookieStore.get(url);
return cookies != null ? cookies : new ArrayList<Cookie>();
}
})
.build();
//为请求添加CookieJar。

至于实现,也非常简单,就是一个Builder模式。具体实现就不做过多的介绍了。

构造request对象

构建request对象的代码如下所示:

1
Request request = new Request.Builder().get().url("url").build();

Request的构建过程也非常简单,在request中的实现如下所示:

1
2
3
4
5
6
7
8
9
10
11
12
13
14
15
16
17
18
19
20
21
22
23
24
25
26
27
28
public Builder() {
this.method = "GET";
this.headers = new Headers.Builder();
}

public Builder get() {
return method("GET", null);
}

public Builder url(String url) {
if (url == null) throw new NullPointerException("url == null");

// Silently replace web socket URLs with HTTP URLs.
if (url.regionMatches(true, 0, "ws:", 0, 3)) {
url = "http:" + url.substring(3);
} else if (url.regionMatches(true, 0, "wss:", 0, 4)) {
url = "https:" + url.substring(4);
}

HttpUrl parsed = HttpUrl.parse(url);
if (parsed == null) throw new IllegalArgumentException("unexpected url: " + url);
return url(parsed);
}

public Request build() {
if (url == null) throw new IllegalStateException("url == null");
return new Request(this);
}

可以看出来,request的构建过程其实也是非常简单的,也是利用建造者模式构建出request对象。在request配置URl、get、等一些列的参数。整体来说,比较简单。

构建Call对象并执行

前两步都是非常简单的,不管是从源码的实现上,还是从我们代码的调用上来看都是非常简单的。但是前面的只是开胃菜,真正的大餐才正要开始。
我们将实例代码的三、四步放到一起来进行分析:

1
2
okhttp3.Call call = okHttpClient.newCall(request);
Response execute = call.execute();

从调用代码上来看,其实现也是非常简单的。下面将从源码的角度一步一步进行分析。
首先是构建Call对象,在OkHttpClient类中的实现如下。

1
2
3
@Override public Call newCall(Request request) {
return new RealCall(this, request, false /* for web socket */);
}

可以看出来,在okhttpClient中只是简单的调用了RealCall方法,我们继续来看在RealCall类中RealCall方法的实现:

1
2
3
4
5
6
7
8
9
10
11
RealCall(OkHttpClient client, Request originalRequest, boolean forWebSocket) {
final EventListener.Factory eventListenerFactory = client.eventListenerFactory();

this.client = client;
this.originalRequest = originalRequest;
this.forWebSocket = forWebSocket;
this.retryAndFollowUpInterceptor = new RetryAndFollowUpInterceptor(client, forWebSocket);

// TODO(jwilson): this is unsafe publication and not threadsafe.
this.eventListener = eventListenerFactory.create(this);
}

RealCall方法也只是对其中的参数进行一些设置。当然,对其中的参数有还是需要有一定的了解。

  • client对象就是我们前面创建的okhttpClient对象
  • originalRequest对象就是已经构建完毕的Request对象
  • forWebSocket值是为了区分是不是进行web socket通信,是为true,否为false;
  • eventListener是为后面执行完之后的回调设置的监听。
    构建一个call对象之后,就通过这个call对象来进行网络请求了。具体执行(同步执行)在RealCall类中的实现代码如下:
    1
    2
    3
    4
    5
    6
    7
    8
    9
    10
    11
    12
    13
    14
    15
    16
    17
    18
    19
    20
    21
    22
    23
    24
    25
    26
    27
    28
    29
    30
    31
    32
    33
    34
    35
    36
    37
    38
    39
    40
    41
    //同步执行网路请求
    @Override public Response execute() throws IOException {
    synchronized (this) {
    if (executed) throw new IllegalStateException("Already Executed");
    executed = true;
    }
    captureCallStackTrace();
    try {
    client.dispatcher().executed(this);
    Response result = getResponseWithInterceptorChain();
    if (result == null) throw new IOException("Canceled");
    return result;
    } finally {
    client.dispatcher().finished(this);
    }
    }

    //跟踪调用栈的信息,这里追踪的是response.body().close()方法的调用信息
    private void captureCallStackTrace() {
    Object callStackTrace = Platform.get().getStackTraceForCloseable("response.body().close()");
    retryAndFollowUpInterceptor.setCallStackTrace(callStackTrace);
    }

    //添加一堆的拦截器。
    Response getResponseWithInterceptorChain() throws IOException {
    // Build a full stack of interceptors.
    List<Interceptor> interceptors = new ArrayList<>();
    interceptors.addAll(client.interceptors());
    interceptors.add(retryAndFollowUpInterceptor);
    interceptors.add(new BridgeInterceptor(client.cookieJar()));
    interceptors.add(new CacheInterceptor(client.internalCache()));
    interceptors.add(new ConnectInterceptor(client));
    if (!forWebSocket) {
    interceptors.addAll(client.networkInterceptors());
    }
    interceptors.add(new CallServerInterceptor(forWebSocket));

    Interceptor.Chain chain = new RealInterceptorChain(
    interceptors, null, null, null, 0, originalRequest);
    return chain.proceed(originalRequest);
    }
    简单分析上面代码的实现:首先利用synchronized加锁,是为了确保一个call对象只能执行一次。captureCallStackTrace方法用于追踪调用栈的信息。通过client.dispatcher().executed(this)将当前的call加入到runningSyncCalls这样一个正在运行的队列中。关于这点,后面将会重点讲到,这里先只是提出这么一个概念。我们继续解析上面的代码,在将当前的call添加到运行队列中后,通过getResponseWithInterceptorChain为当前的call添加一堆的拦截器,并将网络请求的结果返回回来,至于getResponseWithInterceptorChain里面的具体实现,我们放在后面来讲。最后,通过client.dispatcher().finished(this);来结束当前访问和释放相关资源。
    下面来了解异步执行的相关逻辑。代码的实现部分同样是在RealCall类中,相关的代码如下:
    1
    2
    3
    4
    5
    6
    7
    8
    @Override public void enqueue(Callback responseCallback) {
    synchronized (this) {
    if (executed) throw new IllegalStateException("Already Executed");
    executed = true;
    }
    captureCallStackTrace();
    client.dispatcher().enqueue(new AsyncCall(responseCallback));
    }
    通过前面的同步访问的分析,我们对异步访问的分析,现在看异步请求就很简单了。前面的步骤都是一样的,就不一一介绍了。我们直接看最后一句,其中的参数AsyncCall表示的其实就是我们要添加的任务请求。在RealCall类中有如下的实现代码:
    1
    2
    3
    4
    5
    6
    7
    8
    9
    10
    11
    12
    13
    14
    15
    16
    17
    18
    19
    20
    21
    22
    23
    24
    25
    26
    27
    28
    29
    30
    31
    32
    33
    34
    35
    36
    37
    38
    39
    40
    41
    42
    43
    final class AsyncCall extends NamedRunnable {
    private final Callback responseCallback;

    AsyncCall(Callback responseCallback) {
    super("OkHttp %s", redactedUrl());
    this.responseCallback = responseCallback;
    }

    String host() {
    return originalRequest.url().host();
    }

    Request request() {
    return originalRequest;
    }

    RealCall get() {
    return RealCall.this;
    }

    @Override protected void execute() {
    boolean signalledCallback = false;
    try {
    Response response = getResponseWithInterceptorChain();
    if (retryAndFollowUpInterceptor.isCanceled()) {
    signalledCallback = true;
    responseCallback.onFailure(RealCall.this, new IOException("Canceled"));
    } else {
    signalledCallback = true;
    responseCallback.onResponse(RealCall.this, response);
    }
    } catch (IOException e) {
    if (signalledCallback) {
    // Do not signal the callback twice!
    Platform.get().log(INFO, "Callback failure for " + toLoggableString(), e);
    } else {
    responseCallback.onFailure(RealCall.this, e);
    }
    } finally {
    client.dispatcher().finished(this);
    }
    }
    }
    而上面AsyncCall继承的NamedRunnable本身也实现了Runnable的接口。所以本质来说,AsyncCall其实就是一个Runnbale,即一个任务。在这里值访问请求任务。我们发现在execute方法中,真正实现访问请求的也是getResponseWithInterceptorChain,如果访问成功就回调onResponse方法,并将response传递过去;否则就回调onFailure方法,并将错误信息和CallBack对象传递过去。当然,最终也是通过finished方法结束访问。分析完了AsyncCall,接来继续分析前面的enqueue方法。发现其在Dispatcher类中的实现逻辑如下:
1
2
3
4
5
6
7
8
9
10
11
12
13
14
15
16
17
18
19
20
21
22
23
/** Ready async calls in the order they'll be run. */
//这个队列代表准备好的异步请求
private final Deque<AsyncCall> readyAsyncCalls = new ArrayDeque<>();

/** Running asynchronous calls. Includes canceled calls that haven't finished yet. */
//这个队列代表正在运行的异步请求
private final Deque<AsyncCall> runningAsyncCalls = new ArrayDeque<>();

/** Running synchronous calls. Includes canceled calls that haven't finished yet. */
//这个队列代表正在运行的同步请求。
private final Deque<RealCall> runningSyncCalls = new ArrayDeque<>();

private int maxRequests = 64;
private int maxRequestsPerHost = 5;

synchronized void enqueue(AsyncCall call) {
if (runningAsyncCalls.size() < maxRequests && runningCallsForHost(call) < maxRequestsPerHost) {
runningAsyncCalls.add(call);
executorService().execute(call);
} else {
readyAsyncCalls.add(call);
}
}

即在当前运行异步请求队列数量小于64且访问同一个主机数量的队列小于5个时,将当前的请求直接加入正在运行的请求队列中,并通过executorService().execute(call)执行,否则的话就将请求添加到准备的请求队列中。至于executorService().execute(call)的方法的实现Dispatcher中创建executorService代码如下:

1
2
3
4
5
6
7
public synchronized ExecutorService executorService() {
if (executorService == null) {
executorService = new ThreadPoolExecutor(0, Integer.MAX_VALUE, 60, TimeUnit.SECONDS,
new SynchronousQueue<Runnable>(), Util.threadFactory("OkHttp Dispatcher", false));
}
return executorService;
}

通过代码可以很清楚的了解,executorService就是创建一个线程池,核心线程数为0,最大线程数为MAX_VALUE,线程空闲时最大的存活时间为60s,容器为先进先出的队列。然后执行execute方法,在线程池中运行该请求。那么运行完毕后,是怎么将请求从运行异步队列中移除?其实,在前面的分析过程中,我们对execute同步请求和enqueue异步请求的都最终会调用的一个方法client.dispatcher().finished(this);并没有仔细的去分析,下面我们分析该方法是如何将运行完成的请求从运行异步队列中移除的。下面是关键性的代码:

1
2
3
4
5
6
7
8
9
10
11
12
13
14
15
16
17
18
19
/** Used by {@code AsyncCall#run} to signal completion. */
void finished(AsyncCall call) {
finished(runningAsyncCalls, call, true);
}

/** Used by {@code Call#execute} to signal completion. */
void finished(RealCall call) {
finished(runningSyncCalls, call, false);
}

private <T> void finished(Deque<T> calls, T call, boolean promoteCalls) {
int runningCallsCount;
Runnable idleCallback;
synchronized (this) {
if (!calls.remove(call)) throw new AssertionError("Call wasn't in-flight!");
if (promoteCalls) promoteCalls();
runningCallsCount = runningCallsCount();
idleCallback = this.idleCallback;
}

通过上面的代码,很容易就发现其实现finished中实现主要就是将已经运行完成的请求从正在运行的异步队列中移除。可以看到,当调用finished(RealCall call)方法时,会调用promoteCalls方法。我们继续来看其实现:

1
2
3
4
5
6
7
8
9
10
11
12
13
14
15
16
private void promoteCalls() {
if (runningAsyncCalls.size() >= maxRequests) return; // Already running max capacity.
if (readyAsyncCalls.isEmpty()) return; // No ready calls to promote.

for (Iterator<AsyncCall> i = readyAsyncCalls.iterator(); i.hasNext(); ) {
AsyncCall call = i.next();

if (runningCallsForHost(call) < maxRequestsPerHost) {
i.remove();
runningAsyncCalls.add(call);
executorService().execute(call);
}

if (runningAsyncCalls.size() >= maxRequests) return; // Reached max capacity.
}
}

很清晰的可以看出来,promoteCalls方法就是在runningAsyncCalls队列数量小于64时,将readyAsyncCalls队列中的请求放入到runningAsyncCalls队列中。然后分别执行。否则就直接返回,什么也不做。相信这里的算是很简单的代码吧,就不多介绍了。到这里,在总结一下上面的三个队列的作用和转化吧。

  • runningAsyncCalls就用存储正在运行的异步请求,当正在请求的数量大于64时,将后面添加的请求放入到readyAsyncCalls队列中,在合适的时机(即当runningAsyncCalls数量小于64时),将readyAsyncCalls放入到runningAsyncCalls队列中。通过这种方式来保障当前正在运行的异步请求数量不会过大,相当于一个排队机制。
  • runningSyncCalls这个队列用于存储正在运行的同步请求,对于同步请求,并没有什么排队机制,因为他是阻塞式的,所以用一个队列来存储即可。

拦截器&网络请求的实现

通过上面的分析,我们并没有真正发现网络请求的实现,在前面的分析过程中,我们只丢下了一个重要的方法并没有深入来讲,即getResponseWithInterceptorChain这个方法。对前面分析的内容比较熟悉的话,应该知道无论是异步请求还是同步请求,都是通过getResponseWithInterceptorChain这个方法获取返回值,然后将在继续下面的内容的。那么肯定,网络请求的具体实现就在getResponseWithInterceptorChain这个方法中了。他在RealCall中的实现如下:

1
2
3
4
5
6
7
8
9
10
11
12
13
14
15
16
17
Response getResponseWithInterceptorChain() throws IOException {
// Build a full stack of interceptors.
List<Interceptor> interceptors = new ArrayList<>();
interceptors.addAll(client.interceptors());
interceptors.add(retryAndFollowUpInterceptor);
interceptors.add(new BridgeInterceptor(client.cookieJar()));
interceptors.add(new CacheInterceptor(client.internalCache()));
interceptors.add(new ConnectInterceptor(client));
if (!forWebSocket) {
interceptors.addAll(client.networkInterceptors());
}
interceptors.add(new CallServerInterceptor(forWebSocket));

Interceptor.Chain chain = new RealInterceptorChain(
interceptors, null, null, null, 0, originalRequest);
return chain.proceed(originalRequest);
}

通过代码,我们可以看到,首先添加了一系列的拦截器。然后创建一个拦截器链RealInterceptorChain,并执行了拦截器链的proceed方法。
我们首先对其中的拦截器进行解析,然后在来解析具体的网路请求。首先,先解释一下interceptors(拦截器)是什么吧。简单来说:
拦截器是一种强大的机制,可以监视,重写和重试调用。
如果相对拦截器更加深入的了解,可以参考githu上的wiki,如果阅读有困难的话,可以参考中文版
一个网络请求实际上就是一个个拦截器执行其intercept方法的过程。而这其中除了用户自定义的拦截器以外还有几个核心的拦截器完成网络访问的核心逻辑,按照先后顺序以此是:

  1. RetryAndFollowUpInterceptor 负责失败重试以及重定向
  2. BridgeInterceptor 负责把用户构造的请求转换为发送到服务器的请求、把服务器返回的响应转换为用户友好的响应
  3. CacheInterceptor 负责读取缓存直接返回、更新缓存
  4. ConnectInterceptor 负责和服务器建立连接
  5. networkInterceptors 配置okHttpClent时设置的,当然,此拦截器不适用于web Socket
  6. CallServerInterceptor 责向服务器发送请求数据、从服务器读取响应数据
    当然,如果有用户自己设计的拦截器,会在上面拦截其执行之前执行。
    在添加拦截器之后,会构建一个拦截器链RealInterceptorChain,并通过proceed方法开启链式调用。
    下面我们先来看一下RealInterceptorChain拦截器链的具体实现:
    1
    2
    3
    4
    5
    6
    7
    8
    9
    10
    11
    12
    13
    14
    15
    16
    17
    18
    19
    20
    21
    22
    23
    24
    25
    26
    27
    28
    29
    30
    31
    32
    33
    34
    35
    36
    37
    38
    39
    40
    41
    42
    43
    44
    45
    46
    47
    48
    49
    50
    51
    52
    53
    54
    55
    56
    57
    58
    59
    60
    61
    62
    63
    64
    65
    66
    67
    68
    69
    70
    71
    72
    73
    74
    75
    76
    77
    78
    79
    80
    81
    **
    * A concrete interceptor chain that carries the entire interceptor chain: all application
    * interceptors, the OkHttp core, all network interceptors, and finally the network caller.
    */
    public final class RealInterceptorChain implements Interceptor.Chain {
    private final List<Interceptor> interceptors;
    private final StreamAllocation streamAllocation;
    private final HttpCodec httpCodec;
    private final RealConnection connection;
    private final int index;
    private final Request request;
    private int calls;

    public RealInterceptorChain(List<Interceptor> interceptors, StreamAllocation streamAllocation,
    HttpCodec httpCodec, RealConnection connection, int index, Request request) {
    this.interceptors = interceptors;
    this.connection = connection;
    this.streamAllocation = streamAllocation;
    this.httpCodec = httpCodec;
    this.index = index;
    this.request = request;
    }

    @Override public Connection connection() {
    return connection;
    }

    public StreamAllocation streamAllocation() {
    return streamAllocation;
    }

    public HttpCodec httpStream() {
    return httpCodec;
    }

    @Override public Request request() {
    return request;
    }

    @Override public Response proceed(Request request) throws IOException {
    return proceed(request, streamAllocation, httpCodec, connection);
    }

    public Response proceed(Request request, StreamAllocation streamAllocation, HttpCodec httpCodec,
    RealConnection connection) throws IOException {
    if (index >= interceptors.size()) throw new AssertionError();

    calls++;

    // If we already have a stream, confirm that the incoming request will use it.
    if (this.httpCodec != null && !this.connection.supportsUrl(request.url())) {
    throw new IllegalStateException("network interceptor " + interceptors.get(index - 1)
    + " must retain the same host and port");
    }

    // If we already have a stream, confirm that this is the only call to chain.proceed().
    if (this.httpCodec != null && calls > 1) {
    throw new IllegalStateException("network interceptor " + interceptors.get(index - 1)
    + " must call proceed() exactly once");
    }

    // Call the next interceptor in the chain.
    RealInterceptorChain next = new RealInterceptorChain(
    interceptors, streamAllocation, httpCodec, connection, index + 1, request);
    Interceptor interceptor = interceptors.get(index);
    Response response = interceptor.intercept(next);

    // Confirm that the next interceptor made its required call to chain.proceed().
    if (httpCodec != null && index + 1 < interceptors.size() && next.calls != 1) {
    throw new IllegalStateException("network interceptor " + interceptor
    + " must call proceed() exactly once");
    }

    // Confirm that the intercepted response isn't null.
    if (response == null) {
    throw new NullPointerException("interceptor " + interceptor + " returned null");
    }

    return response;
    }
    }
    上面代码比较多,重要的内容并不多,我们只需要看着重看第63行到66行就可以。从整体上来说,RealInterceptorChain中的proceed方法主要做了两件事情:
  • 实例化下一个拦截器对应的RealIterceptorChain对象,这个对象会传递给当前的拦截器
  • 调用当前拦截器的intercept方法,将下一个拦截器的orChain对象传递下去。

接下来我们就来分析以下传入到拦截器链中的拦截器的具体内容.我们首先来分析第一个拦截器:

RetryAndFollowUpInterceptor拦截器

作用:

  • 在网络请求失败后重试
  • 当服务器返回当前请求需要进行重定向时直接发起新的请求,并在条件允许的情况下复用当前连接
    其在RetryAndFollowUpInterceptor类中的构造函数和重要方法Response的实现如下:
    1
    2
    3
    4
    5
    6
    7
    8
    9
    10
    11
    12
    13
    14
    15
    16
    17
    18
    19
    20
    21
    22
    23
    24
    25
    26
    27
    28
    29
    30
    31
    32
    33
    34
    35
    36
    37
    38
    39
    40
    41
    42
    43
    44
    45
    46
    47
    48
    49
    50
    51
    52
    53
    54
    55
    56
    57
    58
    59
    60
    61
    62
    63
    64
    65
    66
    67
    68
    69
    70
    71
    72
    73
    74
    private static final int MAX_FOLLOW_UPS = 20;
    private final OkHttpClient client;
    private final boolean forWebSocket;
    private StreamAllocation streamAllocation;
    private Object callStackTrace;
    private volatile boolean canceled;

    public RetryAndFollowUpInterceptor(OkHttpClient client, boolean forWebSocket) {
    this.client = client;
    this.forWebSocket = forWebSocket;
    }

    @Override public Response intercept(Chain chain) throws IOException {
    Request request = chain.request();

    streamAllocation = new StreamAllocation(
    client.connectionPool(), createAddress(request.url()), callStackTrace);

    int followUpCount = 0;
    Response priorResponse = null;
    while (true) {
    if (canceled) {
    streamAllocation.release();
    throw new IOException("Canceled");
    }

    Response response = null;
    boolean releaseConnection = true;
    try {
    //执行下一个拦截器链的proceed方法
    response = ((RealInterceptorChain) chain).proceed(request, streamAllocation, null, null);
    releaseConnection = false;
    } catch (RouteException e) {
    ...
    } finally {
    // We're throwing an unchecked exception. Release any resources.
    if (releaseConnection) {
    streamAllocation.streamFailed(null);
    streamAllocation.release();
    }
    }

    // Attach the prior response if it exists. Such responses never have a body.
    if (priorResponse != null) {
    response = response.newBuilder()
    .priorResponse(priorResponse.newBuilder()
    .body(null)
    .build())
    .build();
    }

    Request followUp = followUpRequest(response);

    if (followUp == null) {
    if (!forWebSocket) {
    streamAllocation.release();
    }
    return response;
    }
    closeQuietly(response.body());

    if (!sameConnection(response, followUp.url())) {
    streamAllocation.release();
    streamAllocation = new StreamAllocation(
    client.connectionPool(), createAddress(followUp.url()), callStackTrace);
    } else if (streamAllocation.codec() != null) {
    throw new IllegalStateException("Closing the body of " + response
    + " didn't close its backing stream. Bad interceptor?");
    }

    request = followUp;
    priorResponse = response;
    }
    }
    经过删减后的代码还是有点多,但是我们只是理解流程的话,值需要特别关注第31行。这行代码是执行下一个拦截器链的proceed方法,而我们知道在下一个拦截器链中又会执行下一个拦截器的intercept方法。所以,整个执行过程都是一个拦截器与拦截链中交替执行,最终完成所有拦截器的操作。

BridgeInterceptor拦截器

作用:
从用户的请求构建网络请求,然后提交给网络,最后从网络相应中提取出用户响应。
下面来看源码实现:

1
2
3
4
5
6
7
8
9
10
11
12
13
14
15
16
17
18
19
20
21
22
23
24
25
26
27
28
29
30
31
32
33
34
35
36
37
38
39
40
41
42
43
44
45
46
47
48
49
50
51
52
53
54
55
56
57
58
59
60
61
62
63
64
65
66
67
68
69
70
71
72
73
74
75
76
public final class BridgeInterceptor implements Interceptor {

private final CookieJar cookieJar;

public BridgeInterceptor(CookieJar cookieJar) {
this.cookieJar = cookieJar;
}

@Override public Response intercept(Chain chain) throws IOException {
Request userRequest = chain.request();
Request.Builder requestBuilder = userRequest.newBuilder();

RequestBody body = userRequest.body();
if (body != null) {
MediaType contentType = body.contentType();
if (contentType != null) {
requestBuilder.header("Content-Type", contentType.toString());
}

long contentLength = body.contentLength();
if (contentLength != -1) {
requestBuilder.header("Content-Length", Long.toString(contentLength));
requestBuilder.removeHeader("Transfer-Encoding");
} else {
requestBuilder.header("Transfer-Encoding", "chunked");
requestBuilder.removeHeader("Content-Length");
}
}

if (userRequest.header("Host") == null) {
requestBuilder.header("Host", hostHeader(userRequest.url(), false));
}

if (userRequest.header("Connection") == null) {
requestBuilder.header("Connection", "Keep-Alive");
}

// If we add an "Accept-Encoding: gzip" header field we're responsible for also decompressing
// the transfer stream.
boolean transparentGzip = false;
if (userRequest.header("Accept-Encoding") == null && userRequest.header("Range") == null) {
transparentGzip = true;
requestBuilder.header("Accept-Encoding", "gzip");
}

List<Cookie> cookies = cookieJar.loadForRequest(userRequest.url());
if (!cookies.isEmpty()) {
requestBuilder.header("Cookie", cookieHeader(cookies));
}

if (userRequest.header("User-Agent") == null) {
requestBuilder.header("User-Agent", Version.userAgent());
}

Response networkResponse = chain.proceed(requestBuilder.build());

HttpHeaders.receiveHeaders(cookieJar, userRequest.url(), networkResponse.headers());

Response.Builder responseBuilder = networkResponse.newBuilder()
.request(userRequest);

if (transparentGzip
&& "gzip".equalsIgnoreCase(networkResponse.header("Content-Encoding"))
&& HttpHeaders.hasBody(networkResponse)) {
GzipSource responseBody = new GzipSource(networkResponse.body().source());
Headers strippedHeaders = networkResponse.headers().newBuilder()
.removeAll("Content-Encoding")
.removeAll("Content-Length")
.build();
responseBuilder.headers(strippedHeaders);
responseBuilder.body(new RealResponseBody(strippedHeaders, Okio.buffer(responseBody)));
}

return responseBuilder.build();
}
}

可以看到,BridgeInterceptor中的实现就比较简单了。主要做了如下的工作:

  • 设置内容长度,内容编码
  • 设置gzip编码,并在接收到内容后进行解压。
  • 添加cookie
  • 设置其他的报头,如User-Agent,Host,Keep-Alive等。

CacheInterceptor拦截器

作用:主要负责Cache的管理
源码分析:

1
2
3
4
5
6
7
8
9
10
11
12
13
14
15
16
17
18
19
20
21
22
23
24
25
26
27
28
29
30
31
32
33
34
35
36
37
38
39
40
41
42
43
44
45
46
47
48
49
50
51
52
53
54
55
56
57
58
59
60
61
62
63
64
65
66
67
68
69
70
71
72
73
74
75
76
77
78
79
80
81
82
83
84
85
86
87
88
89
90
91
92
93
94
95
96
97
98
99
100
101
public final class CacheInterceptor implements Interceptor {
final InternalCache cache;

public CacheInterceptor(InternalCache cache) {
this.cache = cache;
}

@Override public Response intercept(Chain chain) throws IOException {
Response cacheCandidate = cache != null
? cache.get(chain.request())
: null;

long now = System.currentTimeMillis();

CacheStrategy strategy = new CacheStrategy.Factory(now, chain.request(), cacheCandidate).get();
Request networkRequest = strategy.networkRequest;
Response cacheResponse = strategy.cacheResponse;

if (cache != null) {
cache.trackResponse(strategy);
}

if (cacheCandidate != null && cacheResponse == null) {
closeQuietly(cacheCandidate.body()); // The cache candidate wasn't applicable. Close it.
}

// If we're forbidden from using the network and the cache is insufficient, fail.
if (networkRequest == null && cacheResponse == null) {
return new Response.Builder()
.request(chain.request())
.protocol(Protocol.HTTP_1_1)
.code(504)
.message("Unsatisfiable Request (only-if-cached)")
.body(Util.EMPTY_RESPONSE)
.sentRequestAtMillis(-1L)
.receivedResponseAtMillis(System.currentTimeMillis())
.build();
}

// If we don't need the network, we're done.
if (networkRequest == null) {
return cacheResponse.newBuilder()
.cacheResponse(stripBody(cacheResponse))
.build();
}

Response networkResponse = null;
try {
networkResponse = chain.proceed(networkRequest);
} finally {
// If we're crashing on I/O or otherwise, don't leak the cache body.
if (networkResponse == null && cacheCandidate != null) {
closeQuietly(cacheCandidate.body());
}
}

// If we have a cache response too, then we're doing a conditional get.
if (cacheResponse != null) {
if (networkResponse.code() == HTTP_NOT_MODIFIED) {
Response response = cacheResponse.newBuilder()
.headers(combine(cacheResponse.headers(), networkResponse.headers()))
.sentRequestAtMillis(networkResponse.sentRequestAtMillis())
.receivedResponseAtMillis(networkResponse.receivedResponseAtMillis())
.cacheResponse(stripBody(cacheResponse))
.networkResponse(stripBody(networkResponse))
.build();
networkResponse.body().close();

// Update the cache after combining headers but before stripping the
// Content-Encoding header (as performed by initContentStream()).
cache.trackConditionalCacheHit();
cache.update(cacheResponse, response);
return response;
} else {
closeQuietly(cacheResponse.body());
}
}

Response response = networkResponse.newBuilder()
.cacheResponse(stripBody(cacheResponse))
.networkResponse(stripBody(networkResponse))
.build();

if (cache != null) {
if (HttpHeaders.hasBody(response) && CacheStrategy.isCacheable(response, networkRequest)) {
// Offer this request to the cache.
CacheRequest cacheRequest = cache.put(response);
return cacheWritingResponse(cacheRequest, response);
}

if (HttpMethod.invalidatesCache(networkRequest.method())) {
try {
cache.remove(networkRequest);
} catch (IOException ignored) {
// The cache cannot be written.
}
}
}
return response;
}
...

通过上面代码就可以分析出来,CacheInterceptor就是负责管理cache的,具体体现如下:

  • 当网络请求有符合要求的cache时直接返回Cache
  • 当服务器返回内容有改变时更新当前cache
  • 如果当前cache失效,则删除

ConnectInterceptor拦截器

作用:与服务端建立连接。
具体代码如下:

1
2
3
4
5
6
7
8
9
10
11
12
13
14
15
16
17
18
19
20
public final class ConnectInterceptor implements Interceptor {
public final OkHttpClient client;

public ConnectInterceptor(OkHttpClient client) {
this.client = client;
}

@Override public Response intercept(Chain chain) throws IOException {
RealInterceptorChain realChain = (RealInterceptorChain) chain;
Request request = realChain.request();
StreamAllocation streamAllocation = realChain.streamAllocation();

// We need the network to satisfy this request. Possibly for validating a conditional GET.
boolean doExtensiveHealthChecks = !request.method().equals("GET");
HttpCodec httpCodec = streamAllocation.newStream(client, doExtensiveHealthChecks);
RealConnection connection = streamAllocation.connection();

return realChain.proceed(request, streamAllocation, httpCodec, connection);
}
}

上面的代码比较简单,我们简单进行分析。在intercept方法中,通过第15行代码创建了一个httpCodec对象,他将在后面的步骤中用到。简单介绍一下httpCodec,他其实就是对HTTP协议操作的抽象,具体实现有Http1Codec(对象HTTP1.1)、Http2Codec(对应Http2.0)两种。
然后通过第16行与服务端建立联系,因为里面的代码比较多,就不展开了。

##CallServerInterceptor拦截器
作用:发送和接收数据。
具体源码如下:

1
2
3
4
5
6
7
8
9
10
11
12
13
14
15
16
17
18
19
20
21
22
23
24
25
26
27
28
29
30
31
32
33
34
35
36
37
38
39
40
41
42
43
44
45
46
47
48
49
@Override public Response intercept(Chain chain) throws IOException {
RealInterceptorChain realChain = (RealInterceptorChain) chain;
HttpCodec httpCodec = realChain.httpStream();
StreamAllocation streamAllocation = realChain.streamAllocation();
RealConnection connection = (RealConnection) realChain.connection();
Request request = realChain.request();

long sentRequestMillis = System.currentTimeMillis();
httpCodec.writeRequestHeaders(request);

Response.Builder responseBuilder = null;
if (HttpMethod.permitsRequestBody(request.method()) && request.body() != null) {
// If there's a "Expect: 100-continue" header on the request, wait for a "HTTP/1.1 100
// Continue" response before transmitting the request body. If we don't get that, return what
// we did get (such as a 4xx response) without ever transmitting the request body.
if ("100-continue".equalsIgnoreCase(request.header("Expect"))) {
httpCodec.flushRequest();
responseBuilder = httpCodec.readResponseHeaders(true);
}

if (responseBuilder == null) {
// Write the request body if the "Expect: 100-continue" expectation was met.
Sink requestBodyOut = httpCodec.createRequestBody(request, request.body().contentLength());
BufferedSink bufferedRequestBody = Okio.buffer(requestBodyOut);
request.body().writeTo(bufferedRequestBody);
bufferedRequestBody.close();
} else if (!connection.isMultiplexed()) {
// If the "Expect: 100-continue" expectation wasn't met, prevent the HTTP/1 connection from
// being reused. Otherwise we're still obligated to transmit the request body to leave the
// connection in a consistent state.
streamAllocation.noNewStreams();
}
}

httpCodec.finishRequest();

if (responseBuilder == null) {
responseBuilder = httpCodec.readResponseHeaders(false);
}

Response response = responseBuilder
.request(request)
.handshake(streamAllocation.connection().handshake())
.sentRequestAtMillis(sentRequestMillis)
.receivedResponseAtMillis(System.currentTimeMillis())
.build();
//。。。省略部分代码。。。
return response;
}

作为拦截连中最后的一个拦截器,我们有必要对其进行分析。我们还是只针对核心部分进行解析:这段代码主要做了这么几件事:

  1. 首先获取HttpCodec对象,至于这个对象的产生在前面的ConnectInterceptor拦截器中。
  2. 通过writeRequestHeaders方法将request写入头部;
  3. 判断是否有需要写入请求的body部分,最后调用finishRequest将所有的数据刷新给底层的Sokcet;
  4. 通过调用readResponseHeaders方法读取响应的头部,;
  5. 然后通过构建一个新的Response对象,并通过openResponseBody获取返回的body
  6. 最后将构建好的response对象返回。

##总体流程图
通过上面的分析,对Okhttp网络请求的流程应该已经有一个比较清晰的认识了,下面是大神总结的一张整体流程图。
okHttp流程图
这篇文章只是对Okhttp整体做流程进行分析,很多的细节部分并没有深入去了解。譬如缓存管理,比如真正的网络请求,譬如IO操作。我们都只停留在具体的方法上。通过这篇文章,我们只知道,Okhhtp的底层是通过Socket进行通信的,利用OkIo来进行高效的IO操作,在缓存方面,使用了LRUCache算法。具体的细节,这里就不展开具体去深入了。

整体流程分析

通过上面的简单使用来看,可以初步看出okhttp的整体流程。
总体架构图
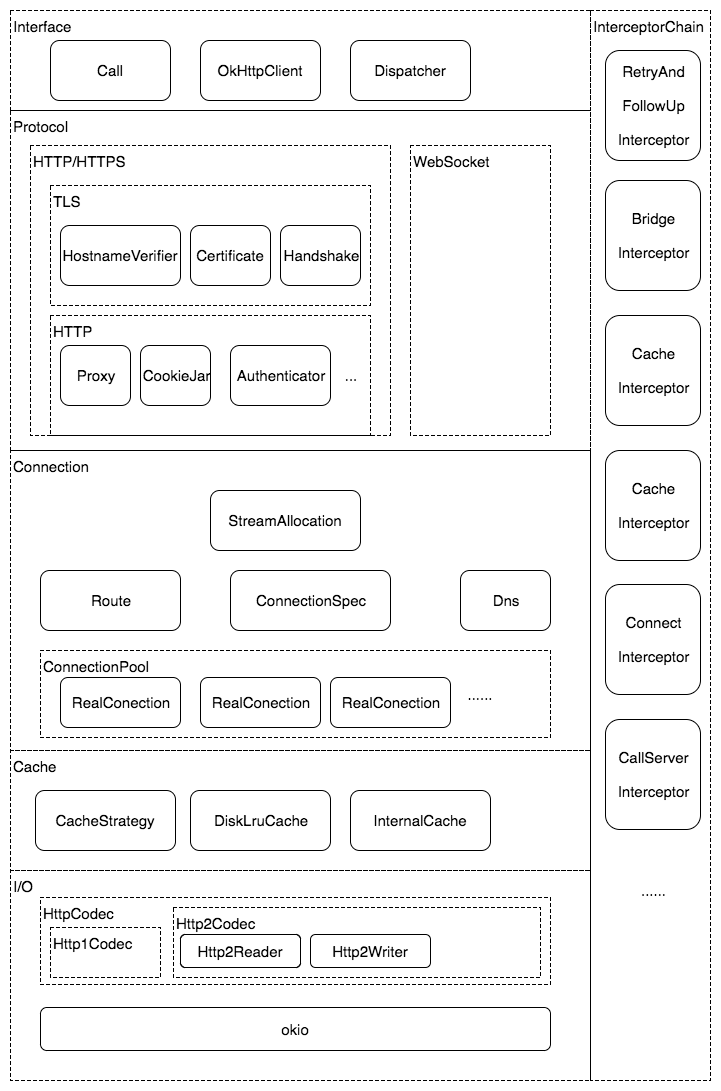
上图是OkHttp的总体架构,大致可以分为以下几层:

  • Interface——接口层:接受网络访问请求
  • Protocol——协议层:处理协议逻辑
  • Connection——连接层:管理网络连接,发送新的请求,接收服务器访问
  • Cache——缓存层:管理本地缓存
  • I/O——I/O层:实际数据读写实现
  • Inteceptor——拦截器层:拦截网络访问,插入拦截逻辑

Okhttp的优势与特点

  • 支持HTTPS/HTTP2/WebSocket等协议
  • 友好支持并发访问,支持多路复用
  • 提供拦截器

参考资料